GP 2010
Reprint Bank Reconciliation Reports in Microsoft Dynamics GP
There may be a case where you need to reprint Bank reconciliation for which Microsoft Dynamics GP allows to do the same, below are the steps to reprint bank reconciliation.
- On the Reports menu, point to Financial, and then click Bank Posting Journals. The following reports can be reprinted:
- Reconciliation Journal: Select this option to reprint the Reconciliation Posting Journal.
- Bank Deposit Journal: Select this option to reprint the Bank Deposit Posting Journal.
- Bank Transaction Journal: Select this option to reprint the Bank Adjustments Posting Journal.
- Cleared Transactions Journal: Select this option to reprint the cleared transactions in the last bank reconciliation.
- In the Ranges list, click Audit Trail Code, and then type the appropriate audit trail codes in the From field and the To field.
- Click Destination.
- Select the appropriate destination, and then click OK.
Note : Make sure you have the access to this report if not follow the below steps to grant access
- On the Microsoft Dynamics GP menu, point to Tools, point to Setup, point to System, and then click Security Tasks.
- In the Task ID list, click the appropriate task ID.
- In the Category list, click Financial.
- In the Product list, click Microsoft Dynamics GP.
- In the Type list, click Reports.
- In the Series list, click Financial.
- Click to select the Reconcile Journal check box, and then click Print Operation Access.
- In the Report Destination window, select the appropriate destination, and then click OK to print a report that displays users who have access to the report.
Note If you receive the following message, save the changes in the window, and then follow step 1 through step 8 again:Select a record first
- Follow step 1 through step 8 for the following reports:
- Bank Adjustment Edit List
- Bank Adjustment Posting Journal
- Marked Transactions Report
- Outstanding Transactions Report
- If users are not displayed on the report that is printed in step 8, follow these steps:
- On the Microsoft Dynamics GP menu, point to Tools, point to Setup, point to System, and then clickSecurity Roles.
- In the Role ID list, click the appropriate role ID.
- Click to select the appropriate security task ID check box, and then click Save.
- Follow step a through step h for the remaining reports.
Issue while deploying SSRS Reports or Business Intelligence reports for GP 2010 R2
Reports in GP 2010 R2 has been enhanced and it has been noticed that the system
generates an error which is as below, however the error itself has a solution
for it

Go the Microsoft SQL Reporting Server
installation folder
Services\ReportServer
Look for
web.config file and open it in text editor.
Find the text executionTimeout=”9000″ and replace with
executionTimeout=”9000″ maxRequestLength=”20690″
4)
Save the file
Run the Business intelligence reports deployment, it should go smoothly
now
Enjoy, Get back to find more tips
Microsoft Dynamics GP 2010 R2 is Now Available
Below is the link for all the features Microsoft Dynamics GP 2010 What’s New
https://mbs.microsoft.com/partnersource/newsevents/news/MSDYGP2010R2_R2nowavailable.htm
Year End Process in Microsoft GP
This article explains the year end process in Microsoft GP, The posting procedure and the closing procedure for the following modules must be performed in the following order.
- Inventory
- Receivables
- Payables
- Fixed Assets
- Analytical Accounting
- General Ledger
It is highly recommended before proceedings with year-end process in GP take a backup of the company and the Dynamics database, detailed steps for each module are explained in the Microsoft KB articles which can be accessed through Partner/Customer source, but the simple steps would be as below (all the steps needs to be repeated for all the above said modules)
Steps to do the year-end
Year End Procedures – Inventory
KB Article – Inventory Year end Process
- Take a Company Database backup.
- Post all the transaction for the module for the year.
- Reconcile Inventory Quantities.
- Complete a Physical Inventory count and post any adjustments.
- Print any additional reports you’ll need for planning or for your permanent records.
- Make a backup of all Company data. (Go to Microsoft Dynamics GP >> Maintenance >> Backup).
- Close the year.
- Close the fiscal periods for the Inventory Series (optional).
-
Make a final backup.
Year End Procedures – Receivables
KB Article – Receivables Year end Process
- Take a Company Database backup.
- Post all the transaction for the module for the year
- Make a backup of all Company data. (Go to Microsoft Dynamics GP >> Maintenance >> Backup).
- Close the fiscal year in the Receivables Year-End Closing window
- Close all fiscal periods for the Sales series (optional)
-
Make a final backup.
Year End Procedures – Payables
KB Article – Payables Year end Process
- Take a Company Database backup.
- Post all the transaction for the module for the year.
- Print the Aged Trial Balance with Options Report to show the status of each Vendor Account.
- Print the Vendor Period Analysis report.
- Close All in the Payables Year-End Closing window
- Close all fiscal periods for the Purchasing series (optional).
- After you have completed the year-end closing procedures for all Sales and Purchasing modules, close the sales tax periods for the year.
- Make a final backup.
Year End Procedures – Fixed Assets
KB Article – Fixed Assets Year end Process
- Take a Company Database backup.
- Post all the transaction for the module for the year.
- Enter in all activity for the current fiscal year. This includes additions, changes, transfers and retirements.
- Run depreciation on all assets through the last day of the current fiscal year.
- Process the GL Interface (GL Posting) routine by going to Tools >> Routines >> Fixed Assets >> GL Posting.
- If required print FA reports.
- Verify that the Quarters are set up correctly for all fiscal years. Go to Tools >> Setup >> Fixed Assets >> Quarters.
- Perform the Fixed Asset Year-End Close routine by going to Tools >> Routines >> Fixed Assets >> Year End.
- Make a final backup.
Year End Procedures – General Ledger
KB Article – General Ledger Year end Process
-
Compete the posting procedure and the closing procedure (in the following order) for Inventory, Receivables, Payables, and Fixed Assets, if applicable.
NOTE: Year-end procedures for Payroll are only performed at the end of the calendar year.
- Post the final adjusting entries in the General Ledger module. If you must make any adjusting entries to allocate revenue, expenses, or depreciation to the year that you are closing, use the Transaction Entry window or the Quick Journal Entry window. If you wish to track your adjustments separately, use the Second Closing Period feature.
- Use SmartList to verify the posting type of each account. Go to Microsoft Dynamics GP >> SmartList >> Accounts. By
default, only the first 1,000 accounts will be displayed. If you have more than 1,000 accounts, double click on the box at the bottom where it says “First 1,000 accounts with no search criteria” and increase the maximum records (in red at bottom). Click the header of the Posting Type column to sort by posting type. Scroll down to the change from Balance Sheet to Profit and Loss. Verify that the last Balance Sheet and the first Profit and Loss accounts are correct. Note that Great Plains treats all unit and allocation accounts as Balance Sheet, but the category will be zero.
- Go to Reports >> Financial >> Accounts. Select All Accounts, then New. Type “all accounts” in the option field. If you are using 8.0 or later, put a check in the Inactive Accounts box. Select Destination >> OK >> Print. If you want to bring the balance forward, the account should be designated as Balance Sheet; if you prefer to close to a retained earnings account, the posting type must be set to Profit and Loss. You can make changes in the Account Maintenance window.
- Close the last period of the fiscal year (optional). Use the Fiscal Periods Setup window. If you use FRx, keep one period in the most recent historical year open.
-
Perform file maintenance on the Financial Series group of modules. Go to Microsoft Dynamics GP >> Maintenance >> Checklinks. Insert all of the financial series. Print the report to the screen.
Go to Tools >> Utilities >> Financial >> Reconcile. Reconcile the year you are closing.
- Verify the setup in the General ledger setup window. If you want to keep historical records, you must click to select the Accounts check box and the Transactions check box in the Maintain History area of the General Ledger Setup window.
- Make a backup. (Go to Microsoft Dynamics GP >> Backup).
- Print a final detailed trial balance.
- Print any required year-end financial statements, e.g. balance sheet, profit and loss statement, statement of cash flows, and statement of retained earnings.
- Set up a new fiscal year using the Fiscal Periods Setup window. Go to Tools >> Setup >> Company >> Fiscal Periods.
- Close the fiscal year. Click Tools >> Routines >> Financial >> Year-End Closing. Specify an account in the Retained Earnings Account field (this account is where the year’s profit or loss is closed to; if you want to distribute the retained earnings for the year to more than one account, you can specify an allocation account or a specific account segment). Specify the number that you want to use as the first journal entry number for the next fiscal year in the Starting Journal Entry field. Click Close Year to start the routine. If the progress window hangs at 50%, don’t reboot. It may take some time for it to close each account to retained earnings. As long as your hard drive is processing, let it continue. When the year-end closing routine is complete, the Year-End Closing Report is printed. This report lists the accounts that were closed and the transactions that were created to close those accounts. The Year-End Closing Report is part of the audit trail; save it for your company’s permanent records. The Year-End Closing Report cannot be reprinted.
- Close all fiscal periods for all series using the Fiscal Periods Setup window (optional).
- Adjust budget figures for the new year and print financial statements. You can adjust your budget using Excel-Base Budgeting, Budget Maintenance, or Single-Account Budget Maintenance. Print the Profit and Loss Statement to verify that profit and loss accounts were closed to the retained earnings account. Print the Balance Sheet to verify that balance sheet accounts indicate that the balances were brought forward. If you are using Advanced Financial Analysis to print your financial statements, you must update the report layout to reflect the current fiscal year. Click Reports >> Financial >> Advanced Financial. Select the financial statement from the Reports list | Open >>Layout. Double-click the first column heading. If the column type is set to Period Range, Year-to-Date, or Variable Year-to-Date, select the current fiscal year in the Year list | OK. Repeat for each column of each report.
-
Make a final backup.
Microsoft GP .ini Settings
How to Modify Word Templates in Microsoft Dynamics GP 2010
Getting used to the new Word Templates functionality can be a bit challenging at times. One of those challenges came in the form or a simple question: “How to resize the logo on the template?”. One thing to keep in mind is that most objects on a Microsoft Dynamics GP Word Template document live inside of content controls. With that said, here are the steps to achieve this, taking the SOP Blank Invoice Form Template* as an example:
1. Under Report Template Maintenance, select the SOP Blank Invoice Form template from the More Reports list.
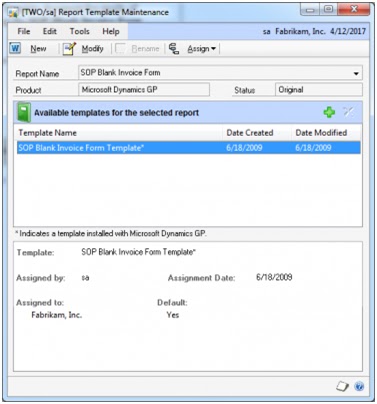
2. Click the New button to create a new template. For this example, we will create the template based on the existing template and we will call it SOP Blank Invoice Form Icon. Click Ok to continue.

3. Highlight the newly created template, then click the Modify button to open Microsoft Word.
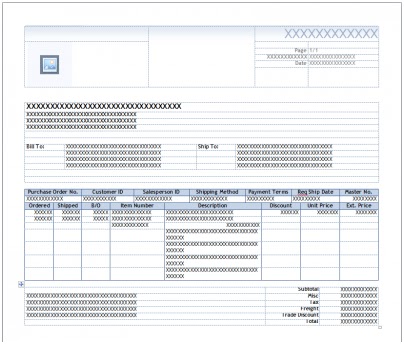
4. Click on the Picture content control to add a logo image.
Note: This image must also exist in the Image library under Template Configuration.
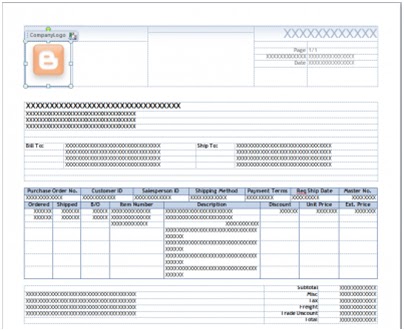
5. Select the logo, right-click, and chose Remove Content Control.

6. Highlight the image and resize accordingly. The following is a sample of the resized image with some extra text to go along:

NOTE: The logo is part of the Header section of the document.
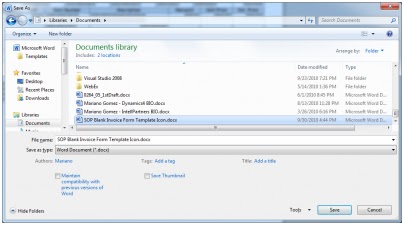
7. Save the modified template to a different directory where it can be imported from later on, for example, My Documents. Close Microsoft Word.
8. Back to Report Template Maintenance, click the Add Template button and select the newly modified template from the My Documents folder. Replace the existing one when prompted.
9. Click the Assign button, then mark the company you want to assign the template to. Then, click on Set as Default to make the new template the default template for the company. Click Save to continue. Click Save to continue.
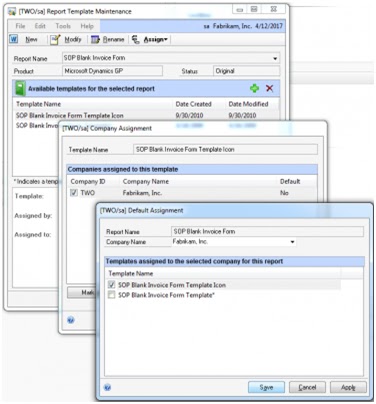
10. Back to the Report Template Maintenance window, highlight the original template and click the Assign button and choose Company. Unmark the company and choose Save.
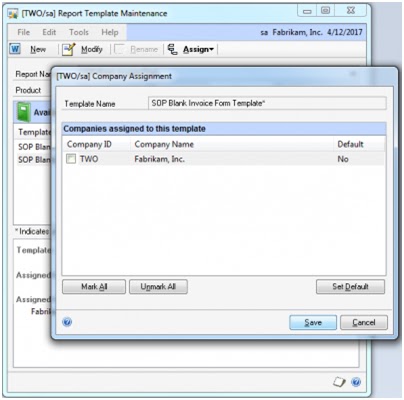
NOTE: This will ensure that the copied version of the original template prints always.
11. To test, select a SOP invoice and print.
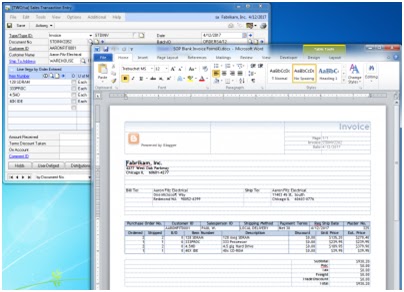
Hope you found these steps simple to follow and that you are enjoying the new Word Templates feature in Microsoft Dynamics GP 2010.
Until next post!
Great Plains Maintenance and Recovery Procedures
The Great Plains system is designed to ensure maximum accuracy and integrity of your accounting data. Occasionally, however, your data tables may become damaged. Hardware failures, power surges, and other problems can damage or destroy data.
While damage occurs infrequently, the factors that cause it are difficult to predict or control, and it’s necessary to take measures to protect your data. Regularly back up your accounting data and perform table maintenance to minimize risk of data loss from table damage.Only SA or DYNSA can open the Backup Company window to make backups. The backup procedure must be run on the server.
Read the Complete article here GP Maintenance
AA Transaction Error – Primary Key Voilation
There are quite a few errors comes in AA which are not highlighted in the knowledge base articles.
Transaction dimensions can’t able to be saved. System had thrown you the following message
- ‘Primary key violation error on table AAG00600. Cannot insert duplicate records on table’ along with that message there was another saying
- ‘The stored proc aagCreateTree returned the following results. DBMS: 2627, Great Plains: 0’.
Resolution
This problem is due to the aaTreeID which is the primary key violation of AAG00600. In order to rectify it follow the process below.
Run all the below steps in SQL Server Query Analyser
Step 1:- select * from dynamics..sy01500 (used to know the company id)
Step2:- select * from dynamics..aag00102 where aatableid = 600 (‘600’ is the source aa table ID for which the corresponding aaRowID mentioned is the last rowid inserted in AAG00600 for the corresponding is company ID)
Step3:- select * from two..aag00600 (look for the aaTree ID were the last record inserted is holding the same ID as that of the aaRowID in aag00102 table)
Step4:- update dynamics..aag00102 set aarowid = 14 where dex_row_id = 4
Find Missing / Deleted Journal Entry in Microsoft GP
When your company auditor ask for all the missing or deleted Journal entry, it’s not a big task now you can get it in minutes by running the script below in your SQL query analyser.
If Object_Id(‘tempdb..#tempJV’) is Not Null
Drop table #tempJV
create table #tempJV
(JVno int,MJV int identity(1,1))
insert into #tempJV (JVno)
(select distinct JRNENTRY from GL20000 )
select wg.MJV as id_is_missing
from #tempJV wg left join #tempJV ti on wg.MJV = ti.JVno
where ti.JVno is null order by wg.MJV
Keep visiting this site for more Dynamics Tips… J
Resetting GP 2010 System Password
Forgot your GP System Password? GP Administrator relax, you can now reset System password with the below trick, but be careful using this trick
Run the below script in SQL Server Management studio
USE DYNAMICS
GO
Update SY02400 Set Password = 0X00202020202020202020202020202020
Keep watching this blog for more tricks on GP…….. J
